Saturday, May 25, 2013

New Blog Information


If you are reading this update you have arrived at my old site and are missing some good stuff.

For current updates to my new blog site please click here....

or here ----->    Glitter, Glue and Paint

or click the button below


Also if you are following me on Bloglovin and are receiving this update please click here

or here ------> Glitter, Glue and Paint on Bloglovin

or click the button below

Follow on Bloglovin


You are going to love the new site and all the good things that have been going on over there.

See you there!!!!!

Monday, April 8, 2013

We are changing our look!


Please bare with me as I get a new look! 

Perfection takes time and we will be providing some great projects very soon!


In the meantime here are a few projects you will enjoy:

Most Recent GGP posts:


Don't forget Google reader is shutting down so follow
 me on bloglovin' so you don't miss something good!

Follow on Bloglovin


~Design your life with a little SPARKLE~


Sunday, March 24, 2013

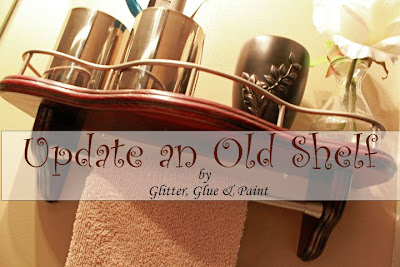
Update an Old Shelf

When you are presented with a DIY challenge you take it. You start thinking about what you are going to do, how you are going to make it a masterpiece.

Then there are some challenges you should just not even think about. 

Stain wood shelf

I was asked by a friend if I could do something with her shelf. At first glance, I said, "Sure, throw it away".
I mean really...you would have said the same thing.


It was old, outdated and just plain ugly. But, she loved her shelf and it was the perfect size in her bathroom next to her sink. So what the heck. I wanted to see what I could do. 

Wood shelf


First thing I did was pull the tarnished, faded gold brassy bar off. I could have puttied the holes, sanded and refinished it. But, instead I decided to paint the bar with Rust-oleum's Metallic Satin Nickel

Rustoleum Spray Paint

Then I lightly sanded the shelf and stained it with Minwax PolyShades Bombay Mahogany.

Bombay Mahogany

I really like how it darkened the natural wood grain and it seemed to have brought the shelf to life. 
Or, I got it at least out of the 80's. LOL

After a couple coats and putting the freshly painted rail back on I kept thinking the shelf needed something. So I had a small spring curtain rod that I sprayed with the Satin Nickel spray paint and glued it to the wood brackets.

And, here you have it an updated shelf with a towel rod. 

Wall shelf

It now has a multi-purpose use in her bathroom. 


A little stain and paint can go a long way to a new look on an old shelf. 

Don't you think?

Most Recent GGP posts:


Don't forget Google reader is shutting down so follow
 me on bloglovin' so you don't miss something good!

Follow on Bloglovin


Design your life with a little SPARKLE!


Friday, March 22, 2013

Antique Photo Canvas/Happy Sits Day!!!


¸¸.•*¨*•♫♪♥ Happy SITS Day to me  ♥♪♫•*¨*•.¸¸♥
¸¸.•*¨*•♫♪♥ Happy SITS Day to me  ♥♪♫•*¨*•.¸¸
♥ ¸¸.•*¨*•♫♪ ♥ Happy SITS Day, Dear Glitter, Glue & Paint  ♥ ♪♫.¸♥ ¸¸.•*¨*•♫♪♥ 
Happy ♥ ♥ ♥ SITS Day ♥♪♫•*¨*•.¸¸♥ ¸¸.•*¨*•♫♪♥♥ to  ♥♥♪♫•*¨*•.¸¸♥me  ¸¸.•*¨*•♫♪.♥.

Don't know what SITSgirls is, well it's a community of 40,000 plus women who support each other through this crazy thing we call blogging.  It's pretty awesome actually.

If you are visiting from SITS, welcome.

I had this post planned for today and then got that good news that I was today's featured blogger so I wanted to give a BIG WELCOME to those of you that come to hang out with me.

Look at what I'm going to show you how to make today...


I made this antique looking photo canvas with a few simple craft supplies. All you need is Canvas, Mod Podge, Scrapbook Paper, Foam Brush, and Craft Paint


Oh, and your picture! 

I printed the words of "The Mr." and mine's song on a piece of photo paper with one of my favorite wedding photos. I also choose to do an 8x10. You know start small in case it doesn't work ;-)

First, I cut some trim out of scrapbook paper and made a border around my canvas with it using mod podge. 


Then I used spray adhesive to attach my printed photo to the canvas.


I lightly sprayed the canvas and let it sit for a minute until it was just tacky enough to attach my photo to the canvas. 


After I let this completely dry for about 30 minutes I put a couple layers of mod podge over the whole canvas. Let the mod podge dry completely between each layer.

After it was completely dry, I just took a sea sponge and just started dabbing some craft acrylic paint around the edges and across the photo. 


 That's all there is to it and now you have a cherish-able gift for anyone. 


If you are new, THANKS for visiting. 
You may have also missed out on some past posts so take some time and catch up what's been going on here at Glitter, Glue & Paint. 

Most Recent GGP posts:


Don't forget google reader is shutting down so follow
 me on bloglovin so you don't miss something good!

Follow on Bloglovin


Design your life with a little SPARKLE!

Tuesday, March 19, 2013

Jolie Cocktail Napkins & Accessory Giveaway

Sometimes I read about doing sponsored giveaways and when one catches my attention I just can't pass it up. And, seeing as I'm all about the "glittery" things in life this was a great opportunity for me to be able to offer this adorable giveaway. Especially after seeing HOW DARN CUTE these cocktail napkins and accessories are. 

Talk about perfect for a "GIRLS NIGHT". 

Cocktail Accessories


You know you are going to enjoy what's in the box when your package is addressed like this...Cute huh??


Here's a little bit of info about Jolie Kolaj and then on to what we are giving away. 

Jolie Kolaj is where modern humor meets vintage design. She is a licensed artist and designs greeting cards,
 stationery, gift wrap, cocktail napkins, accessories and more. 

She introduces a bespoke canvas collection featuring vintage paper dolls, her original humor and embellished with glitter and beautiful bits of ephemera so every one of her designs is original and unique. 

See for yourself and then make sure you join the giveaway!!..

Here are the cute things you will be getting and how can you not LOVE THEM!

This cute set of Lunch, Laughter & Libations napkins, great for the afternoon cocktail with the girls. 

Lunch Napkins

How about an adorable "Glambassador" note pad. Perfect for them little notes!!


What would we do without our smartphones and these cute little cocktail napkins to remind us. 

Cute Cocktail Napkins

You also get a set of these drink coasters. Perfect for that glass of wine. 
And, what shopaholic wouldn't love a set of these.

Drink Coasters

The napkin sets are so colorful and cute. They make any "Happy Hour" cheerful.


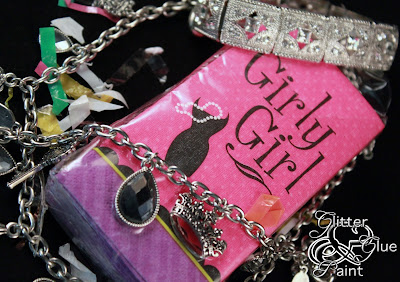
How about a cute set of napkins to carry around in your purse. You can be the envy of every "Girly Girl". 


Don't you just love the humor. 


Are you excited about getting all these cute napkins and accessories. Then grab that glass of wine and sign up for this "Awesome" girly giveaway!!


a Rafflecopter giveaway

Thanks to Jolie Kolaj for this great giveaway. If you are interested in seein more of her work you can visitor her here

Sunday, March 17, 2013

AirStone Back-splash

While browsing one of my favorite home improvement stores, Lowes. I came across the best product EVER. And, if I say so then you know it's true ;-)

Airstone Backsplash

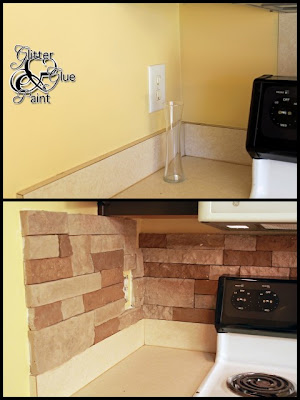
I wanted to redo our back-splash but I knew I couldn't really fit it in my budget. Oh what am I saying we didn't even have a back-splash. This is what I was dealing with.

**OH YEAH...BE PREPARED THIS IS A LENGTHY POST BUT I PROMISE YOU WILL LOVE IT!


It really did need something. And, that something is AirStone. It's a natural very light weight stone that only uses putty and a hacksaw. 
BEST PART: It was in my cheap budget. 

AirStone Brick

Now we have to remember that "The Mr." is not handy so if he can do it anyone can. He laid out the stone, read them directions and was ready to go.


This is how simple this is. You cut the stone with a hacksaw or jigsaw.


Slap some putty on the back of the stone and press it up against the wall and WAA-LAA!!


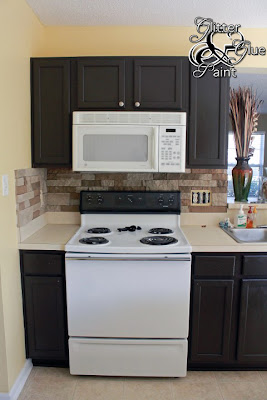
This has been the easiest project that has had the biggest impact on our kitchen make-over. See the difference for yourself and you tell me?

Backsplash Stone

Kitchen Stone

Kitchen Stone

Can I say we are in love with this stuff. I want to stone everything in my house...LOL

AirStone Backsplash

How's that for a quick transformation for you. 


Oh yeah! We couldn't help ourselves and if you knew the deal you wouldn't have either. Am I a fan of stainless steel....the jury is still out on that one!!


Now let's take care of this side of the kitchen.


I'm working on new rugs. They should be here any day :-)

But, let's get back to work. This is all the tools we needed. 
(Can you see my cute little under the counter lights...love).


You can see how easy it was to layout the stone. And, here's the finished project.

AirStone

AirStone Kitchen

AirStone Backsplash

Now for some fun Before & After pics.

(Not sure why the color is so off on this one. 
Must be my awesome photography skills)


Even though it was a bit long I hope that you are not only enjoying our kitchen transformation but that you are being inspired. 

Just a few more projects left in the kitchen and then I will have a final reveal. If you missed any of the previous kitchen makeover posts, don't worry. I got your back.


And if you are new and haven't seen the new home before we started all this you can see it here

We will have a new look very soon here at GGP so make sure you come back and visit. 

Don't forget to....

~Design your life with a little SPARKLE~


** I have not been paid or compensated for my post today. This has been my own personal experience and review. And, if it was crap I would be the first one to say so. LOL

LinkWithin

Related Posts Plugin for WordPress, Blogger...

You can also find me at Hometalk by clicking here.
Follow on Bloglovin


Crazy Deals

Dresses from Shabby Apple

Designed By:

Munchkin Land Designs
Elements by Silvia Romeo

Site Tracker

PageRank Checker Follow on Bloglovin
Lijit Search Rivit Media PublisherConnect With Advertisers - Sign up for SocialSpark! google-site-verification: googleb78de21e77c286e8.html
 
Designed by Munchkin Land Designs • Copyright 2012 • All Rights Reserved